Homemade Banana Bread Recipe: Moist and Delicious

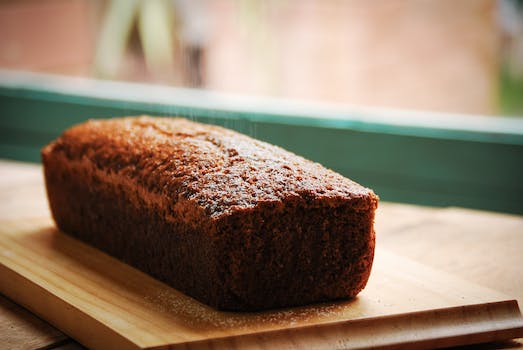
Hey there, fellow bakers! I’m excited to share with you my favorite recipe for homemade banana bread. It’s moist, delicious, and super easy to make.

Let’s get started!

Ingredients:

  • 3 ripe bananas
  • 1/3 cup melted butter
  • 1 teaspoon baking soda
  • Pinch of salt
  • 3/4 cup sugar
  • 1 large egg, beaten
  • 1 teaspoon vanilla extract
  • 1 1/2 cups all-purpose flour

Homemade Banana Bread Recipe
Photo by Mimi Moromisato

Instructions:

  1. Preheat your oven to 350°F (175°C).
  2. Mash the ripe bananas with a fork in a bowl until smooth.
  3. Stir in the melted butter.
  4. Add the baking soda and salt. Stir.
  5. Mix in the sugar, beaten egg, and vanilla extract.
  6. Add the flour and mix until just combined.
  7. Pour the batter into a greased 4×8 inch loaf pan.
  8. Bake for 50-60 minutes, or until a toothpick inserted into the center comes out clean.
  9. Let the banana bread cool in the pan for at least 15 minutes before removing it and slicing.

That’s it! Your homemade banana bread is ready to serve. I love to enjoy it warm with a little bit of butter on top. It’s also great for breakfast or as a snack.

Give this recipe a try and let me know what you think in the comments below. Happy baking!

Easy Blueberry Muffins Recipe: Soft and Fluffy

Hey guys! Today, I want to share with you my easy blueberry muffins recipe. I am not a professional baker, but this recipe never fails me. The muffins always turn out soft and fluffy, and my family loves them.

Ingredients:

  • 2 cups all-purpose flour
  • 1 tablespoon baking powder
  • 1/2 teaspoon salt
  • 1/2 cup unsalted butter, softened
  • 1 cup granulated sugar
  • 2 large eggs
  • 1/2 cup milk
  • 1 teaspoon vanilla extract
  • 1 1/2 cups fresh blueberries

Instructions:

  1. Preheat your oven to 375°F (190°C). Line a muffin tin with muffin cups or grease it with cooking spray.
  2. In a medium bowl, whisk together the flour, baking powder, and salt. Set aside.
  3. In a large bowl, cream together the butter and sugar until light and fluffy.
  4. Add the eggs, one at a time, beating well after each addition.
  5. Stir in the milk and vanilla extract.
  6. Add the dry ingredients to the wet ingredients, and mix until just combined.
  7. Gently fold in the blueberries.
  8. Scoop the batter into the prepared muffin cups, filling each cup about 3/4 full.
  9. Bake for 20 to 25 minutes, or until a toothpick inserted into the center of a muffin comes out clean.
  10. Let the muffins cool in the pan for a few minutes before transferring them to a wire rack to cool completely.

That’s it! Your easy blueberry muffins are ready to enjoy. You can serve them warm or at room temperature. They are perfect for breakfast, brunch, or as a snack. You can also store them in an airtight container at room temperature for up to 3 days.

Blueberry muffins
Photo by Deeana Arts

Tips:

  • You can use frozen blueberries instead of fresh ones, but do not thaw them before adding them to the batter.
  • If you do not have muffin cups, you can use a greased muffin tin. However, the muffins may stick to the tin, so be careful when removing them.
  • You can add a streusel topping to the muffins for extra texture and flavor. Mix together 1/4 cup all-purpose flour, 1/4 cup granulated sugar, and 2 tablespoons unsalted butter, until crumbly. Sprinkle the streusel over the muffin batter before baking.

I hope you enjoyed this easy blueberry muffins recipe. Let me know in the comments if you tried it and how it turned out. If you have any other tips or variations, feel free to share them as well. Happy baking!

Classic Chocolate Chip Cookie Recipe

Hey guys!

Today, I want to share with you my favorite chocolate chip cookie recipe. It’s a classic recipe that never fails to satisfy my sweet tooth.

Ingredients:

    chocolate chip cookie
    Photo by Lisa Fotios

  • 2 1/4 cups all-purpose flour
  • 1 tsp baking soda
  • 1 tsp salt
  • 1 cup unsalted butter, softened
  • 3/4 cup white sugar
  • 3/4 cup brown sugar
  • 2 large eggs
  • 2 tsp vanilla extract
  • 2 cups semisweet chocolate chips

Directions:

  1. Preheat your oven to 375°F (190°C).
  2. In a small bowl, mix together the flour, baking soda, and salt.
  3. In a large bowl, cream the butter, white sugar, and brown sugar until smooth.
  4. Add the eggs and vanilla extract to the butter mixture and mix well.
  5. Gradually add the flour mixture to the butter mixture and mix until just blended.
  6. Stir in the chocolate chips.
  7. Drop the cookie dough by rounded tablespoons onto ungreased baking sheets.
  8. Bake for 10-12 minutes or until golden brown.
  9. Cool on wire racks.

And that’s it! This recipe makes about 36 cookies, so you’ll have plenty to share (or not).

One thing I love about this recipe is how versatile it is. You can switch up the chocolate chips for white chocolate chips, peanut butter chips, or even add some chopped nuts. The possibilities are endless.

So, go ahead and give this classic chocolate chip cookie recipe a try. Your taste buds will thank you!

Classic Cheesecake Recipe: Rich and Creamy

Hey there, cheesecake lovers! Today, I’m excited to share with you my classic cheesecake recipe that’s rich and creamy. I’ve been making this recipe for years now, and it’s always a crowd-pleaser. So, let’s get started!

Ingredients:

  • 1 1/2 cups graham cracker crumbs
  • 1/4 cup granulated sugar
  • Cheesecake
    Photo by alleksana

  • 1/2 cup unsalted butter, melted
  • 4 packages (8 oz each) cream cheese, softened
  • 1 1/4 cups granulated sugar
  • 1 tablespoon vanilla extract
  • 4 large eggs, room temperature
  • 1/3 cup heavy whipping cream

Instructions:

  1. Preheat your oven to 325°F.
  2. In a medium bowl, mix together graham cracker crumbs, 1/4 cup granulated sugar, and melted butter until well combined.
  3. Press the crumb mixture into the bottom of a 9-inch springform pan. Bake for 10 minutes, then set aside to cool.
  4. In a large bowl, beat cream cheese until smooth and creamy.
  5. Add in 1 1/4 cups granulated sugar and vanilla extract, and beat until well combined.
  6. Add in eggs, one at a time, and beat well after each addition.
  7. Stir in heavy whipping cream until mixture is smooth and creamy.
  8. Pour the mixture into the prepared crust.
  9. Bake for 1 hour or until the center is almost set.
  10. Turn off the oven and leave the cheesecake inside for an additional 30 minutes.
  11. Remove from the oven and let it cool completely on a wire rack. Once it’s cool, refrigerate it for at least 4 hours before serving.

That’s it! This classic cheesecake recipe is perfect for any occasion. It’s rich, creamy, and has just the right amount of sweetness. I like to serve it with fresh berries or a fruit compote for an extra burst of flavor.

If you’re looking for a dessert that’s sure to impress, then give this classic cheesecake recipe a try. I promise you won’t be disappointed!

Classic Apple Pie Recipe with Flaky Crust

Hey there, fellow bakers! Today I want to share with you my favorite recipe for a classic apple pie with a flaky crust. This recipe has been passed down in my family for generations, and it never fails to impress.

Ingredients:

  • 1 double pie crust recipe (homemade or store-bought)
  • 6 cups thinly sliced, peeled apples (about 6 medium apples)
  • 3/4 cup granulated sugar
  • 1 tablespoon lemon juice
  • 1 teaspoon ground cinnamon
  • 1/4 teaspoon ground nutmeg
  • 1/4 teaspoon salt
  • 2 tablespoons unsalted butter, cut into small pieces
  • 1 egg, beaten

Apple Pie recipe
Photo by Asya Vlasova

Instructions:

  1. Preheat your oven to 375°F (190°C).
  2. Roll out one pie crust and place it in a 9-inch pie dish. Trim the edges with scissors or a knife.
  3. In a large bowl, toss the sliced apples with the sugar, lemon juice, cinnamon, nutmeg, and salt until well coated.
  4. Pour the apple mixture into the prepared pie crust, and dot with butter pieces.
  5. Roll out the second pie crust and place it on top of the apples. Trim the edges and crimp to seal.
  6. Cut a few slits on the top crust to allow steam to escape. Brush the beaten egg over the top crust.
  7. Bake the pie for 45-50 minutes, or until the crust is golden brown and the filling is bubbly.
  8. Let the pie cool for at least 30 minutes before slicing and serving.

This apple pie recipe is a classic for a reason – it’s delicious! The flaky crust is the perfect compliment to the sweet and tart apple filling. I love serving this pie warm with a scoop of vanilla ice cream on top. It’s the ultimate comfort food dessert.

If you’re in the mood for a classic dessert that will please a crowd, give this apple pie recipe a try. It’s easy to make and always a hit.

Chocolate Cake Recipe with Chocolate Ganache

Hey there, fellow chocolate lovers! Today, I’m sharing with you my go-to chocolate cake recipe with chocolate ganache. This recipe is perfect for any occasion, whether it’s a birthday, anniversary, or just a Friday night treat.

Chocolate cake
Photo by Alexander Dummer

Ingredients:

  • 2 cups sugar
  • 1 3/4 cups all-purpose flour
  • 3/4 cup unsweetened cocoa powder
  • 2 teaspoons baking soda
  • 1 teaspoon baking powder
  • 1 teaspoon salt
  • 2 eggs
  • 1 cup milk
  • 1/2 cup vegetable oil
  • 2 teaspoons vanilla extract
  • 1 cup boiling water
  • 1 cup chocolate chips

Instructions:

  1. Preheat the oven to 350°F (175°C). Grease and flour two 9-inch round cake pans.
  2. In a large mixing bowl, combine the sugar, flour, cocoa powder, baking soda, baking powder, and salt. Mix well.
  3. Add the eggs, milk, oil, and vanilla extract. Beat on medium speed for 2 minutes.
  4. Stir in the boiling water. The batter will be thin, but that’s okay.
  5. Stir in the chocolate chips.
  6. Pour the batter evenly into the prepared pans.
  7. Bake for 30-35 minutes, or until a toothpick inserted in the center of the cake comes out clean.
  8. Let the cakes cool in the pans for 10 minutes before removing them from the pans and placing them on a wire rack to cool completely.

Chocolate Ganache:

To make the chocolate ganache, you’ll need:

  • 1 cup heavy cream
  • 8 ounces semi-sweet chocolate chips

Instructions:

  1. In a medium saucepan, heat the heavy cream until it just begins to boil.
  2. Remove the pan from the heat and stir in the chocolate chips until they are completely melted and the mixture is smooth.
  3. Let the ganache cool for about 10 minutes before pouring it over the cooled cake.

And that’s it! You now have a delicious chocolate cake with chocolate ganache that will satisfy any chocolate craving. Enjoy!

Carrot Cake Recipe with Cream Cheese Frosting

Hey there!

I recently baked a delicious carrot cake with cream cheese frosting and I just had to share the recipe with you. It’s perfect for any occasion, whether it’s a birthday, holiday, or just because you’re in the mood for something sweet.

Ingredients:

  • 2 cups all-purpose flour
  • 2 teaspoons baking powder
  • 1 1/2 teaspoons baking soda
  • 1 teaspoon salt
  • 2 teaspoons ground cinnamon
  • 1/2 teaspoon ground nutmeg
  • 1/2 teaspoon ground ginger
  • 4 large eggs
  • 1 1/2 cups granulated sugar
  • 1 cup vegetable oil
  • 2 teaspoons vanilla extract
  • 3 cups grated carrots
  • 1/2 cup chopped walnuts (optional)

Instructions:

  1. Preheat your oven to 350°F (180°C).
  2. Grease and flour two 9-inch cake pans.
  3. Whisk together the flour, baking powder, baking soda, salt, cinnamon, nutmeg, and ginger in a medium bowl.
  4. In a separate large bowl, beat the eggs, sugar, oil, and vanilla extract until well combined.
  5. Gradually add the dry ingredients to the wet mixture and mix until just combined.
  6. Stir in the grated carrots and chopped walnuts (if using).
  7. Pour the batter into the prepared cake pans and bake for 30-35 minutes, or until a toothpick inserted into the center comes out clean.
  8. Let the cakes cool completely before frosting.


Carrot cake
Photo by chudesabyvaut


Cream Cheese Frosting:

  • 1/2 cup unsalted butter, softened
  • 8 ounces cream cheese, softened
  • 4 cups powdered sugar
  • 1 teaspoon vanilla extract

Instructions:

  1. In a large bowl, beat the butter and cream cheese together until smooth.
  2. Add in the powdered sugar and vanilla extract and beat until well combined.
  3. Frost the cooled cake with the cream cheese frosting and enjoy!

I hope you enjoy this recipe as much as I did. It’s the perfect balance of sweetness and spice, and the cream cheese frosting is the perfect complement to the carrot cake. Let me know in the comments if you try it out!

Spicy Chicken Wings Recipe: Perfect for Game Day

Hey there, fellow foodies! Today, I want to share with you my favorite spicy chicken wings recipe that is perfect for game day. Whether you’re watching football, basketball, or any other sport, these wings will surely satisfy your cravings.

Spicy chicken wings
Photo by Angelo Greñas

Ingredients:

  • 2 lbs chicken wings
  • 1/4 cup hot sauce
  • 1/4 cup melted butter
  • 1 tsp garlic powder
  • 1 tsp onion powder
  • 1 tsp paprika
  • 1/2 tsp cayenne pepper
  • Salt and pepper to taste

Instructions:

  1. Preheat your oven to 400°F.
  2. Line a baking sheet with parchment paper and place the chicken wings on it.
  3. In a small bowl, mix together the hot sauce, melted butter, garlic powder, onion powder, paprika, cayenne pepper, salt, and pepper.
  4. Brush the mixture over the chicken wings, making sure to coat them evenly.
  5. Bake the wings for 35-40 minutes, or until they are crispy and golden brown.
  6. Remove the wings from the oven and let them cool for a few minutes before serving.
  7. Garnish with chopped parsley or cilantro, if desired.

And that’s it! This recipe is super easy to make and the result is deliciously spicy chicken wings that will surely impress your guests. You can also adjust the amount of cayenne pepper to make it less spicy or more depending on your preference.

So, what are you waiting for? Try this recipe out and let me know how it turns out for you. And don’t forget to enjoy it with your favorite dipping sauce and a cold beer. Cheers!

Homemade Salsa Recipe: Fresh and Flavorful

Hey there, salsa lovers! One of my favorite things to make in the kitchen is homemade salsa. It’s so easy to make, and the flavor is so much better than store-bought salsa. Plus, you can customize it to your liking by adjusting the spice level or adding in your favorite ingredients.

Here’s my go-to recipe for fresh and flavorful homemade salsa:

Ingredients:

Salsa
Photo by Pixabay

  • 4-5 ripe tomatoes
  • 1/2 red onion
  • 1 jalapeño pepper
  • 1/4 cup fresh cilantro
  • 1 lime, juiced
  • 1 tsp salt
  • 1 tsp sugar

Instructions:

  1. Remove the stems from the tomatoes and chop them into small pieces.
  2. Finely chop the red onion.
  3. Remove the stem and seeds from the jalapeño pepper and finely chop.
  4. Chop the cilantro.
  5. Combine all of the ingredients in a bowl and mix well.
  6. Let the salsa sit for at least 30 minutes to allow the flavors to meld together.
  7. Give the salsa a taste and adjust the seasoning as needed.

That’s it! This salsa is perfect for dipping tortilla chips, topping tacos or grilled meats, or even as a salad dressing. And the best part is, you can adjust the spice level to your liking. If you like it really spicy, add in another jalapeño or even a serrano pepper. If you prefer a milder salsa, remove the seeds from the jalapeño or omit it altogether.

I hope you give this homemade salsa recipe a try! Let me know in the comments if you have any other favorite salsa ingredients or variations.

Homemade Pico de Gallo Recipe

Hey guys! I wanted to share with you my go-to recipe for homemade pico de gallo. It’s super easy to make and tastes amazing!

Ingredients:

  • 4-5 medium sized tomatoes
  • 1/2 red onion
  • homemade
    Photo by Pixabay

  • 1 jalapeno pepper (seeds removed)
  • 1/4 cup chopped cilantro
  • 1 tablespoon lime juice
  • 1/2 teaspoon salt

Instructions:

  1. Chop up your tomatoes into small pieces and place them in a large mixing bowl.
  2. Finely chop your red onion and jalapeno pepper and add them to the mixing bowl.
  3. Add in your chopped cilantro, lime juice, and salt.
  4. Mix everything together until it’s well combined.
  5. Cover the mixing bowl with plastic wrap and place it in the refrigerator for at least an hour to let the flavors meld together.
  6. Take it out of the fridge and give it a good stir before serving.

That’s it! This homemade pico de gallo is perfect for topping tacos, burritos, or just eating with chips. It’s also a great way to use up any extra tomatoes or cilantro you have lying around. Enjoy!