Classic Chicken Pot Pie: A Flaky Crust and Savory Filling

Hey there, foodies! Today, I’m going to talk to you about one of my all-time favorite comfort foods: Classic Chicken Pot Pie. There’s nothing quite like the smell of a freshly baked pot pie, with its flaky golden crust and savory filling. It’s the perfect meal for a cold winter night or a rainy day.

Now, I’ll be honest, making a chicken pot pie from scratch can be a bit time-consuming. But trust me when I say it’s worth the effort. There’s nothing quite like the satisfaction of cutting into a homemade pot pie and seeing all the delicious filling spilling out.

Let’s start with the crust. A good pot pie crust should be flaky and buttery, with just the right amount of crunch. I like to use a simple recipe that combines flour, salt, butter, and ice water. You’ll want to make sure the butter is cold when you start, so it doesn’t melt too quickly and ruin the texture of the crust. I usually chill my dough in the fridge for at least 30 minutes before rolling it out and placing it in my pie dish.

Chicken Pot Pie
Photo by Klaus Nielsen

Now, on to the filling. For a classic chicken pot pie, you’ll need chicken (duh), vegetables, and a creamy sauce. I like to use a mix of carrots, peas, and potatoes, but you can really use any vegetables you like. The key is to make sure they’re cooked through before you add them to the pie, so they don’t end up undercooked or mushy in the final product.

For the sauce, I start by making a roux with butter and flour, then whisk in chicken broth and milk to create a creamy base. I add in some herbs and spices to give it a little extra flavor, then mix in the cooked chicken and vegetables. Once everything is combined, I pour the mixture into my crust and top it off with another layer of dough.

Then it’s off to the oven! I usually bake my pot pie for about 45 minutes at 375 degrees Fahrenheit, until the crust is golden brown and the filling is bubbling. It’s important to let the pie cool for a few minutes before cutting into it, so the filling has a chance to set.

And there you have it, folks. Classic Chicken Pot Pie: a flaky crust and savory filling that’s sure to warm you up on a chilly day. Give it a try and let me know what you think!


Homemade Chicken Noodle Soup: A Soul-Soothing Bowl

Hey there, foodies! Today I want to talk about one of my favorite comfort foods – homemade chicken noodle soup. There’s nothing quite like a warm bowl of soup on a chilly day, and chicken noodle soup has always been my go-to. Not only is it delicious, but it’s also easy to make and incredibly soothing for the soul.

First things first, let’s talk about the ingredients. You’ll need:

  • 1 whole chicken
  • Chicken noodle soup
    Photo by Nguyen Phuong NGUYEN

  • 1 onion, chopped
  • 3 carrots, peeled and chopped
  • 3 stalks of celery, chopped
  • 2 cloves of garlic, minced
  • 8 cups of chicken broth
  • 1 bay leaf
  • 1 tablespoon of fresh thyme leaves
  • Salt and pepper to taste
  • 8 oz of egg noodles

Start by cooking the chicken in a large pot of water until it’s fully cooked. Remove the chicken from the pot and let it cool. Once it’s cool enough to handle, remove the meat from the bones and set it aside. Discard the bones and skin.

In the same pot, sauté the onion, carrots, celery, and garlic until they’re softened. Add the chicken broth, bay leaf, thyme, salt, and pepper. Bring it to a boil, then reduce the heat and let it simmer for about 20 minutes.

Add the egg noodles to the pot and cook until they’re tender. Add the chicken back in and cook for another 5-10 minutes until everything is heated through.

And that’s it! Homemade chicken noodle soup in just a few simple steps. Not only is it delicious, but it’s also incredibly comforting. There’s something about a warm bowl of soup that just makes everything better.

If you’re feeling adventurous, you can also add in some other ingredients to switch things up. I like to add in some frozen peas or corn to give it a little extra flavor. You could also add some diced potatoes or even some spicy peppers if you like a little heat.

So, the next time you’re feeling down or just need a little comfort food, give homemade chicken noodle soup a try. I promise it won’t disappoint.

Homemade Cinnamon Rolls Recipe: Perfect for Breakfast

Hey guys! I’m so excited to share with you my recipe for homemade cinnamon rolls. This recipe is perfect for breakfast or even as a sweet treat for any time of day. The best part is, you can make them from scratch and they’re super easy to make!

Ingredients:

  • 2 cups of flour
  • 1/4 cup of sugar
  • 1/2 tsp of salt
  • 1/4 cup of butter, softened
  • 1/4 cup of warm water
  • 1 egg
  • 1 tbsp of yeast
  • 1/2 cup of brown sugar
  • 1 tbsp of cinnamon
  • 1/4 cup of butter, melted

homemade
Photo by Pixabay

Instructions:

  1. In a mixing bowl, combine the flour, sugar, and salt.
  2. Add in the softened butter, warm water, egg, and yeast. Mix until a dough forms.
  3. Knead the dough on a floured surface for about 5 minutes.
  4. Place the dough in a greased bowl, cover with a cloth, and let it rise for 30 minutes.
  5. In a separate bowl, mix together the brown sugar and cinnamon.
  6. Roll out the dough on a floured surface into a rectangle shape.
  7. Brush melted butter over the dough.
  8. Sprinkle the cinnamon-sugar mixture over the dough.
  9. Roll up the dough tightly and cut into 1-inch slices.
  10. Place the slices in a greased baking dish and let them rise for another 30 minutes.
  11. Bake at 350°F for 20-25 minutes, or until golden brown.
  12. Let cool for a few minutes before serving.

Final Thoughts:

Trust me, these cinnamon rolls are so delicious and worth the effort. They’re perfect for breakfast or as a sweet treat. You can even make them ahead of time and store them in the freezer. Just pop them in the microwave or oven to reheat and enjoy! Let me know how they turn out for you!

Homemade Salsa Recipe: Fresh and Flavorful

Hey there, salsa lovers! One of my favorite things to make in the kitchen is homemade salsa. It’s so easy to make, and the flavor is so much better than store-bought salsa. Plus, you can customize it to your liking by adjusting the spice level or adding in your favorite ingredients.

Here’s my go-to recipe for fresh and flavorful homemade salsa:

Ingredients:

Salsa
Photo by Pixabay

  • 4-5 ripe tomatoes
  • 1/2 red onion
  • 1 jalapeño pepper
  • 1/4 cup fresh cilantro
  • 1 lime, juiced
  • 1 tsp salt
  • 1 tsp sugar

Instructions:

  1. Remove the stems from the tomatoes and chop them into small pieces.
  2. Finely chop the red onion.
  3. Remove the stem and seeds from the jalapeño pepper and finely chop.
  4. Chop the cilantro.
  5. Combine all of the ingredients in a bowl and mix well.
  6. Let the salsa sit for at least 30 minutes to allow the flavors to meld together.
  7. Give the salsa a taste and adjust the seasoning as needed.

That’s it! This salsa is perfect for dipping tortilla chips, topping tacos or grilled meats, or even as a salad dressing. And the best part is, you can adjust the spice level to your liking. If you like it really spicy, add in another jalapeño or even a serrano pepper. If you prefer a milder salsa, remove the seeds from the jalapeño or omit it altogether.

I hope you give this homemade salsa recipe a try! Let me know in the comments if you have any other favorite salsa ingredients or variations.

Homemade Pico de Gallo Recipe

Hey guys! I wanted to share with you my go-to recipe for homemade pico de gallo. It’s super easy to make and tastes amazing!

Ingredients:

  • 4-5 medium sized tomatoes
  • 1/2 red onion
  • homemade
    Photo by Pixabay

  • 1 jalapeno pepper (seeds removed)
  • 1/4 cup chopped cilantro
  • 1 tablespoon lime juice
  • 1/2 teaspoon salt

Instructions:

  1. Chop up your tomatoes into small pieces and place them in a large mixing bowl.
  2. Finely chop your red onion and jalapeno pepper and add them to the mixing bowl.
  3. Add in your chopped cilantro, lime juice, and salt.
  4. Mix everything together until it’s well combined.
  5. Cover the mixing bowl with plastic wrap and place it in the refrigerator for at least an hour to let the flavors meld together.
  6. Take it out of the fridge and give it a good stir before serving.

That’s it! This homemade pico de gallo is perfect for topping tacos, burritos, or just eating with chips. It’s also a great way to use up any extra tomatoes or cilantro you have lying around. Enjoy!

Homemade Onion Rings Recipe

Hey there, fellow foodies! Today, I want to share with you my homemade onion rings recipe. I have been making these for years now and they never fail to impress my family and friends. So, grab your apron and let’s get cooking!

Ingredients:

  • 2 large onions
  • Onion rings
    Photo by Pixabay

  • 1 cup all-purpose flour
  • 1 tsp baking powder
  • 1 tsp salt
  • 1 tsp paprika
  • 1 egg
  • 1 cup milk
  • 1 cup breadcrumbs
  • Vegetable oil (for frying)

Instructions:

  1. Peel and slice the onions into rings. Separate the rings and set them aside.
  2. In a bowl, mix the flour, baking powder, salt, and paprika.
  3. In another bowl, beat the egg and mix in the milk.
  4. Dip the onion rings into the flour mixture, then into the egg mixture, and finally into the breadcrumbs.
  5. Heat the vegetable oil in a large pan over medium-high heat.
  6. Once the oil is hot, carefully place the onion rings in the pan. Fry for 2-3 minutes on each side or until golden brown.
  7. Remove the onion rings from the pan and place them on a paper towel to absorb excess oil.
  8. Serve hot with your favorite dipping sauce.

And there you have it – a delicious and easy homemade onion rings recipe that will surely impress your guests. You can also customize this recipe by adding your favorite spices or herbs to the flour mixture. I hope you enjoy making and eating these onion rings as much as I do!

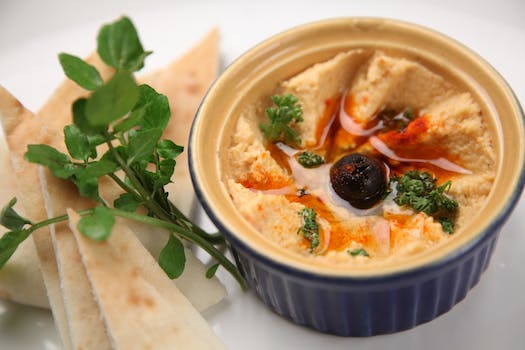
Easy Homemade Hummus Recipe

Hey there! Today, I’m excited to share with you my easy homemade hummus recipe.

First of all, let me just say that I’m a HUGE fan of hummus. It’s a tasty and healthy snack that’s perfect for any time of day. I used to buy hummus from the store, but then I realized that making it at home is actually super easy and way more cost-effective.

Here’s what you’ll need:

hummus
Photo by Naim Benjelloun

  • 1 can of chickpeas (15 oz)
  • 2 cloves of garlic
  • 3 tablespoons of tahini
  • 2 tablespoons of lemon juice
  • 1/4 cup of olive oil
  • 1/2 teaspoon of salt
  • 1/4 teaspoon of cumin
  • Water (as needed)

Instructions:

  1. Drain and rinse the chickpeas.
  2. In a food processor, blend the chickpeas, garlic, tahini, lemon juice, olive oil, salt, and cumin until smooth.
  3. If the hummus is too thick, add water (1 tablespoon at a time) until it reaches your desired consistency.
  4. Transfer the hummus to a serving bowl and drizzle with olive oil.
  5. Enjoy with pita bread, crackers, vegetables, or whatever you like!

That’s it! See, I told you it was easy. Plus, you can customize the recipe to your liking by adding herbs, spices, or roasted vegetables.

I hope you give this recipe a try and let me know how it turns out for you. Happy snacking!