Tofu Stir-Fry: An Easy Vegetarian Dinner Recipe

Hey there, fellow foodies! Today, I want to share with you one of my go-to recipes for a quick and easy vegetarian dinner – tofu stir-fry!

First of all, let me just say that tofu can be a bit intimidating if you’ve never cooked with it before. But trust me, once you get the hang of it, it’s a versatile and delicious ingredient that can be used in so many different ways.

For this stir-fry, you’ll need:

tofu
Photo by Ella Olsson

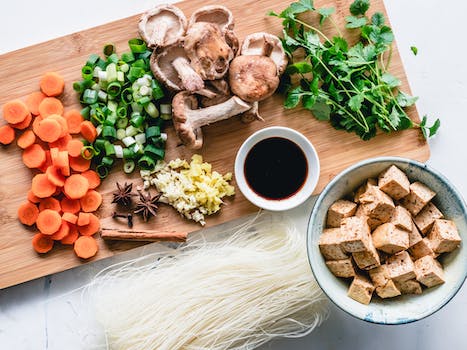
  • 1 block of firm tofu
  • 3-4 cups of mixed veggies (I like to use bell peppers, broccoli, and carrots)
  • 1/4 cup of soy sauce
  • 2 tablespoons of honey
  • 2 cloves of garlic, minced
  • 1 tablespoon of grated ginger
  • 2 tablespoons of vegetable oil
  • Salt and pepper, to taste

First, you’ll want to press the tofu to remove any excess water. I usually wrap it in paper towels and place a heavy object on top for about 15-20 minutes. Then, cut the tofu into small cubes.

Next, heat up your vegetable oil in a large skillet or wok over medium-high heat. Add in your minced garlic and grated ginger, and stir for about 30 seconds until fragrant.

Then, add in your mixed veggies and stir-fry for about 5-7 minutes until they start to soften. Season with salt and pepper to taste.

Move the veggies to one side of the pan and add in your cubed tofu on the other side. Let the tofu cook for a few minutes on each side until it starts to turn golden brown.

In a small bowl, whisk together your soy sauce and honey until combined. Pour this mixture over the tofu and veggies, and stir everything together until everything is coated in the sauce.

Let everything cook for another 2-3 minutes until the sauce has thickened up a bit and everything is heated through.

And that’s it! You can serve this tofu stir-fry over rice or noodles, or just enjoy it on its own. It’s a great way to get in some extra veggies and plant-based protein, and it’s so easy to customize with whatever veggies you have on hand.

Give this recipe a try and let me know what you think in the comments below!

Slow-Cooked Pot Roast Recipe

Hey there, fellow foodies! Today, I want to share with you my favorite slow-cooked pot roast recipe. This dish is the ultimate comfort food and is perfect for those chilly evenings when you just want to cozy up with something warm and delicious.

Ingredients:

Slow-cooked pot roast
Photo by Efecan Efe

  • 3-4 lb. beef chuck roast
  • 1 onion, chopped
  • 4 cloves garlic, minced
  • 2 cups beef broth
  • 1 cup red wine
  • 2 tbsp tomato paste
  • 2 tbsp Worcestershire sauce
  • 1 tsp dried thyme
  • 1 tsp dried rosemary
  • 3-4 carrots, peeled and chopped
  • 3-4 potatoes, peeled and chopped
  • Salt and pepper to taste

Instructions:

  1. Heat a large skillet over medium-high heat. Season the beef roast with salt and pepper, then place it in the skillet and sear on all sides until browned.
  2. Remove the roast from the skillet and place it in the slow cooker.
  3. Add the chopped onion and garlic to the skillet and sauté until softened, about 3-4 minutes.
  4. Add the beef broth, red wine, tomato paste, Worcestershire sauce, thyme, and rosemary to the skillet. Stir to combine.
  5. Pour the mixture over the roast in the slow cooker.
  6. Add the chopped carrots and potatoes to the slow cooker.
  7. Cover and cook on low for 8-10 hours or on high for 4-6 hours, or until the beef is tender and falls apart easily.
  8. Remove the beef from the slow cooker and let it rest for 5-10 minutes.
  9. Using a slotted spoon, remove the vegetables from the slow cooker and place them on a serving platter.
  10. Slice the beef and place it on top of the vegetables.
  11. Serve hot and enjoy!

This slow-cooked pot roast recipe is a family favorite in my house. The beef is so tender and flavorful, and the vegetables are perfectly cooked and infused with all of the delicious juices from the roast. It’s the perfect meal to make on a lazy Sunday, and the leftovers are just as good as the first serving. I hope you give this recipe a try and enjoy it as much as my family does!

Pan-Seared Salmon with Lemon Butter Sauce

Hey guys, I wanted to share with you one of my favorite dishes to cook at home – Pan-Seared Salmon with Lemon Butter Sauce. It’s a simple recipe that’s easy to make, yet it tastes like it came straight out of a fancy restaurant.

First, I start by seasoning my salmon fillets with salt and pepper. Then, I heat up some olive oil in a pan over medium-high heat. Once the oil is hot, I add the salmon fillets to the pan, skin side down.

I let the salmon cook for about 4-5 minutes on each side, until it’s golden brown and crispy on the outside, and tender and flaky on the inside. While the salmon is cooking, I prepare the lemon butter sauce.

Salmon
Photo by Malidate Van

To make the sauce, I melt some butter in a small saucepan over low heat. Once the butter is melted, I add some minced garlic and cook it for a minute or so, until it’s fragrant. Then, I add some fresh lemon juice, lemon zest, and a pinch of salt and whisk everything together until it’s well combined.

Once the salmon is done cooking, I remove it from the pan and place it on a plate. Then, I pour the lemon butter sauce over the salmon and garnish it with some fresh parsley.

The result is a delicious and flavorful dish that’s perfect for a weeknight dinner or a special occasion. The salmon is perfectly cooked and the lemon butter sauce adds a bright and tangy flavor that complements the fish perfectly.

I hope you guys give this recipe a try and let me know how it turns out! It’s definitely one of my go-to dishes when I want something quick, easy, and delicious.

Lobster Risotto: A Decadent Seafood Dinner

Hey guys,

I recently had the pleasure of trying lobster risotto for the first time and let me tell you, it was a game changer. The combination of creamy risotto and succulent lobster is a match made in heaven.

Now, I know what you’re thinking – lobster can be expensive. But trust me, it’s worth splurging on for a special occasion or a fancy dinner at home. Plus, you can always use frozen lobster tails to save some money.

lobster risotto
Photo by ROMAN ODINTSOV

Here’s my recipe for lobster risotto:

Ingredients:

  • 1 cup Arborio rice
  • 4 cups chicken or vegetable broth
  • 1/2 cup white wine
  • 1/2 onion, chopped
  • 2 garlic cloves, minced
  • 1/2 cup grated Parmesan cheese
  • 2 lobster tails, cooked and chopped
  • 2 tablespoons butter
  • Salt and pepper to taste

Instructions:

  1. In a medium saucepan, bring the broth to a simmer and keep it warm on low heat.
  2. In a large pot or Dutch oven, melt the butter over medium heat. Add the onion and garlic and sauté until soft, about 5 minutes.
  3. Add the Arborio rice to the pot and stir until the grains are coated in the butter and onion mixture.
  4. Turn up the heat to medium-high and add the white wine. Stir until the wine has been absorbed by the rice.
  5. Add the warm broth, one ladleful at a time, stirring constantly and waiting until each ladleful has been absorbed before adding the next one. This process should take about 20-25 minutes.
  6. Once the rice is cooked and the risotto is creamy, stir in the Parmesan cheese and chopped lobster tails.
  7. Season with salt and pepper to taste.
  8. Serve hot and enjoy!

This recipe serves 4 people and pairs perfectly with a glass of white wine. Trust me, your taste buds will thank you.

Have you tried lobster risotto before? Let me know in the comments!

Until next time,

[Your name]

Homemade Pizza Recipe: How to Make Pizza from Scratch

Hey guys! Today I’m going to share with you my favorite homemade pizza recipe. Making pizza from scratch is not as difficult as it seems, and the end result is always worth it. So let’s get started!

Ingredients:

    Homemade pizza recipe
    Photo by Katerina Holmes

  • 2 1/4 tsp active dry yeast
  • 1 tsp granulated sugar
  • 1 1/2 cups warm water
  • 3 1/2 cups all-purpose flour
  • 1 tsp salt
  • 1 tbsp olive oil
  • Pizza toppings of your choice (tomato sauce, cheese, vegetables, meats, etc.)

Instructions:

  1. Preheat your oven to 450°F (230°C).
  2. In a large mixing bowl, combine the yeast, sugar, and warm water. Stir until the yeast and sugar are dissolved. Let it sit for about 5 minutes until it becomes foamy.
  3. Add the flour, salt, and olive oil to the bowl. Mix until a dough forms.
  4. Knead the dough on a floured surface for about 5 minutes until it becomes smooth and elastic.
  5. Place the dough in a greased bowl and cover it with a towel. Let it rise in a warm place for about 30 minutes until it doubles in size.
  6. Punch down the dough and roll it out on a floured surface to your desired thickness.
  7. Place the rolled-out dough on a greased pizza pan or baking sheet.
  8. Add your desired toppings to the pizza.
  9. Bake the pizza for about 15-20 minutes until the crust is golden brown and the cheese is melted.

And there you have it! Your very own homemade pizza made from scratch. This recipe is perfect for a fun night in with friends or for a family dinner. Customize the toppings to your liking and enjoy!

Thanks for reading, and happy pizza-making!

Creamy Mushroom Chicken Recipe

Hey there foodies!

I just wanted to share with you my latest culinary triumph – Creamy Mushroom Chicken! It’s a recipe that I stumbled upon in an old cookbook and decided to give it a try. Let me tell you, it did not disappoint!

First things first, let me give you the ingredients:

  • 4 boneless, skinless chicken breasts
  • 1 tablespoon olive oil
  • 1 tablespoon butter
  • 1 onion, diced
  • 2 cloves garlic, minced
  • 1 pound mushrooms, sliced
  • 1 cup chicken broth
  • 1 cup heavy cream
  • 1 tablespoon cornstarch
  • Salt and pepper, to taste


culinary
Photo by Pietro Jeng


Now, onto the cooking!

I started by seasoning the chicken breasts with salt and pepper, and then browning them in a pan with some olive oil. Once they were cooked through, I set them aside to rest.

Next, I added some butter to the same pan and sautéed some diced onions and minced garlic until they were fragrant. Then, I added the sliced mushrooms and cooked them until they were tender.

Once the mushrooms were done, I added a cup of chicken broth and let it simmer for a few minutes. Then, I added a cup of heavy cream and let that simmer as well.

To thicken up the sauce a bit, I mixed a tablespoon of cornstarch with some cold water and added it to the pan. I stirred it in and let it cook for a few more minutes until the sauce had thickened up to my liking.

Finally, I added the chicken breasts back to the pan and let them warm up in the sauce for a few minutes.

And voila! Creamy Mushroom Chicken was born.

I served it over some rice and it was absolutely delicious. The creamy sauce was the perfect complement to the tender chicken and earthy mushrooms. It was a hit with my family and I’m sure it will be with yours too!

So, if you’re looking for a new chicken recipe to try out, give Creamy Mushroom Chicken a shot. You won’t regret it!

Creamy Garlic Shrimp Alfredo Recipe

Hey guys! Today I want to share with you my favorite recipe for creamy garlic shrimp alfredo. This dish is not only super easy to make, but it’s also absolutely delicious and perfect for impressing guests or just treating yourself to a fancy dinner at home.

Ingredients:

  • 1 pound of shrimp, peeled and deveined
  • 1 pound of fettuccine pasta
  • Recipe
    Photo by Dapur Melodi

  • 2 cups of heavy cream
  • 1 cup of grated parmesan cheese
  • 4 cloves of garlic, minced
  • 2 tablespoons of butter
  • Salt and pepper, to taste
  • Parsley, chopped (optional)

Instructions:

  1. Start by cooking the fettuccine pasta according to the instructions on the package. Drain and set aside.
  2. In a large skillet, melt the butter over medium heat. Add the minced garlic and cook for about a minute, or until fragrant.
  3. Add the shrimp to the skillet and cook for about 2-3 minutes on each side, or until they turn pink and are fully cooked. Remove the shrimp from the skillet and set aside.
  4. Reduce the heat to low and add the heavy cream to the skillet. Stir constantly until the cream starts to thicken.
  5. Add the grated parmesan cheese to the skillet and stir until it’s melted and well combined with the cream.
  6. Add the cooked fettuccine pasta to the skillet and toss to coat it with the creamy sauce.
  7. Add the cooked shrimp to the skillet and gently toss it with the pasta and sauce.
  8. Season with salt and pepper to taste. If you like, you can also sprinkle some chopped parsley on top for extra flavor and color.
  9. Serve hot and enjoy!

See, I told you it was easy! This creamy garlic shrimp alfredo recipe is one of my go-to meals when I want something quick and delicious. The combination of the creamy sauce and the garlicky shrimp is just heavenly, and it’s perfect for a cozy night in or a special occasion.

If you’re not a fan of shrimp, you can easily substitute it with chicken or even mushrooms for a vegetarian option. The possibilities are endless!

I hope you give this recipe a try and let me know what you think. And if you have any other favorite alfredo recipes, feel free to share them in the comments below. Happy cooking!

Beef Stroganoff: A Hearty Russian Classic

Hey there foodies! Today, I want to talk about one of my all-time favorite dishes – Beef Stroganoff! It’s a hearty Russian classic that never fails to warm my soul with its creamy, savory goodness.

For those who haven’t tried it, Beef Stroganoff is a dish made with sautéed strips of beef, mushrooms, onions, and a sour cream-based sauce. It’s usually served over egg noodles, but you can also serve it with rice or mashed potatoes.

There are many variations of Beef Stroganoff out there, but the classic recipe is said to have originated in 19th century Russia. It was named after the Stroganoff family, who were wealthy merchants and avid supporters of the arts. The dish was often served at their lavish dinner parties and quickly became a hit among the aristocracy.

Beef Stroganoff
Photo by Deivis Sandoval

Nowadays, Beef Stroganoff is enjoyed by people all over the world and has become a staple in many households. It’s easy to see why – the dish is hearty, comforting, and oh-so delicious!

If you’re looking to make Beef Stroganoff at home, here’s a simple recipe that you can try:

Ingredients:

  • 1 lb. of beef sirloin, cut into thin strips
  • 1 onion, chopped
  • 8 oz. of sliced mushrooms
  • 2 cloves of garlic, minced
  • 2 tbsp. of butter
  • 1 cup of beef broth
  • 1 tbsp. of Worcestershire sauce
  • 1 tbsp. of Dijon mustard
  • 1/2 cup of sour cream
  • Salt and pepper to taste
  • Egg noodles or rice for serving

Instructions:

  1. Season the beef strips with salt and pepper and set aside.
  2. In a large skillet, melt the butter over medium-high heat.
  3. Add the onions and mushrooms and sauté until the onions are translucent and the mushrooms are tender.
  4. Add the minced garlic and sauté for an additional minute.
  5. Add the beef strips to the skillet and cook until browned on all sides.
  6. Add the beef broth, Worcestershire sauce, and Dijon mustard to the skillet and stir to combine.
  7. Reduce the heat to low and simmer for 10-15 minutes until the sauce has thickened.
  8. Add the sour cream to the skillet and stir until well combined.
  9. Serve over egg noodles or rice.

And that’s it! With just a few simple ingredients, you can make a delicious Beef Stroganoff that will satisfy your cravings and warm your heart. Give it a try and let me know what you think!

Until next time, happy cooking!

Baked Lemon Chicken with Asparagus Recipe

Hey everyone, today I want to share with you my all-time favorite recipe for baked lemon chicken with asparagus. This dish is not only delicious but also super easy to make, perfect for a quick and healthy dinner.

Ingredients:

  • 4 boneless, skinless chicken breasts
  • 1 pound of asparagus
  • 2 lemons
  • 4 cloves of garlic, minced
  • 2 tablespoons of olive oil
  • Salt and pepper to taste


Baked lemon chicken
Photo by Tim Douglas


Instructions:

  1. Preheat the oven to 400°F.
  2. Wash and trim the asparagus and place them in a baking dish.
  3. In a small bowl, mix together the minced garlic, olive oil, salt, and pepper.
  4. Drizzle the garlic mixture over the asparagus and toss until evenly coated.
  5. Place the chicken breasts on top of the asparagus in the baking dish.
  6. Cut one lemon into thin slices and place them on top of the chicken breasts.
  7. Squeeze the juice of the remaining lemon over the chicken and asparagus.
  8. Bake in the preheated oven for 25-30 minutes, or until the chicken is cooked through and the asparagus is tender.
  9. Serve hot and enjoy!

That’s it! This baked lemon chicken with asparagus recipe is one of my go-to dishes for a healthy and satisfying dinner. The lemon and garlic add a delicious flavor to the chicken, while the asparagus makes the dish extra nutritious and filling. Plus, it only takes a few minutes to prepare and can be easily customized with your favorite herbs and spices.

If you give this recipe a try, let me know how it turns out in the comments below! I hope you enjoy it as much as I do.

Classic Spaghetti and Meatballs Recipe

Hey guys, today I want to share with you my all-time favorite recipe – Classic Spaghetti and Meatballs!

Nothing beats a warm bowl of homemade spaghetti and meatballs, and this recipe is one that always hits the spot. It’s perfect for a cozy night in with friends or family, and it’s sure to impress your taste buds.

Here’s what you’ll need:

  • 1 pound spaghetti
  • 1 pound ground beef
  • 1/2 cup breadcrumbs
  • 1/4 cup grated parmesan cheese
  • 1/4 cup chopped fresh parsley
  • 1 egg
  • 1 clove garlic, minced
  • 1/2 teaspoon salt
  • 1/4 teaspoon black pepper
  • 2 tablespoons olive oil
  • 1 large onion, chopped
  • 2 cloves garlic, minced
  • 1 can (28 ounces) crushed tomatoes
  • 1 teaspoon sugar
  • 1/4 teaspoon salt
  • 1/4 teaspoon black pepper
  • 1/4 cup chopped fresh basil

Spaghetti
Photo by Lisa Fotios

First, start by cooking the spaghetti according to the package instructions. While the spaghetti is cooking, you can start on the meatballs. In a large bowl, combine the ground beef, breadcrumbs, parmesan cheese, parsley, egg, garlic, salt, and pepper. Mix everything together until well combined.

Next, form the meat mixture into small balls (about 1 inch in diameter). In a large skillet, heat the olive oil over medium-high heat. Add the meatballs to the skillet and cook until browned on all sides, about 5 minutes. Remove the meatballs from the skillet and set them aside on a plate.

In the same skillet, add the onion and garlic and cook until softened, about 5 minutes. Add the crushed tomatoes, sugar, salt, and pepper. Bring the mixture to a simmer and let it cook for about 10 minutes.

Finally, add the meatballs back into the skillet and let them cook in the tomato sauce for an additional 10 minutes. Toss the cooked spaghetti with the tomato sauce and meatballs. Top with chopped fresh basil and enjoy!

This Classic Spaghetti and Meatballs recipe is sure to become a regular in your recipe rotation. It’s easy to make, delicious, and comforting. Give it a try and let me know what you think!