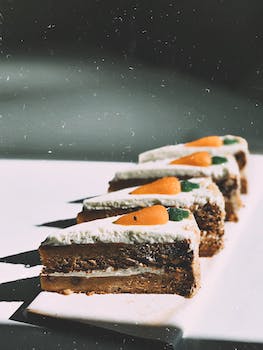
Homemade Brownies Recipe: Fudgy and Delicious

Hey there, fellow bakers! Today, I want to share with you my go-to recipe for homemade brownies that are not only fudgy but also incredibly delicious. I’ve been making these brownies for years, and they never fail to impress.

To start, preheat your oven to 350°F (175°C) and line a 9×13 inch baking pan with parchment paper. This will make it easier to remove the brownies from the pan once they’re done.

Now, let’s get to the ingredients. You’ll need:

– 1 cup unsalted butter
– 2 1/4 cups granulated sugar
– 4 large eggs
– 1 1/4 cups cocoa powder
– 1 teaspoon salt
– 1 teaspoon baking powder
– 1 teaspoon espresso powder (optional)
– 1 tablespoon vanilla extract
– 1 1/2 cups all-purpose flour
– 2 cups semi-sweet chocolate chips
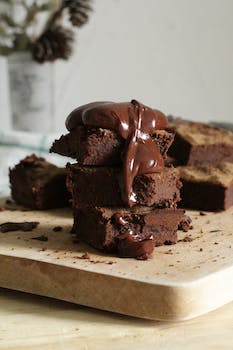
Brownies
Photo by Marta Dzedyshko

In a medium-sized saucepan, melt the butter over low heat. Once melted, remove from heat and stir in the sugar. Add the eggs, one at a time, stirring well after each addition. Next, add the cocoa powder, salt, baking powder, espresso powder (if using), and vanilla extract. Mix until well combined.

Add the flour and chocolate chips to the mixture and stir until just combined. Be careful not to overmix, as this will result in tough brownies.

Pour the batter into the prepared baking pan and smooth the top with a spatula. Bake for 30-35 minutes or until a toothpick inserted in the center comes out clean. Let the brownies cool completely in the pan before removing them and cutting into squares.

And there you have it, my homemade brownies recipe that’s fudgy and delicious. These brownies are perfect for any occasion, whether it’s a birthday party or a simple afternoon snack. I hope you give this recipe a try and enjoy it as much as I do!


Easy Blueberry Muffins Recipe: Soft and Fluffy

Hey guys! Today, I want to share with you my easy blueberry muffins recipe. I am not a professional baker, but this recipe never fails me. The muffins always turn out soft and fluffy, and my family loves them.

Ingredients:

  • 2 cups all-purpose flour
  • 1 tablespoon baking powder
  • 1/2 teaspoon salt
  • 1/2 cup unsalted butter, softened
  • 1 cup granulated sugar
  • 2 large eggs
  • 1/2 cup milk
  • 1 teaspoon vanilla extract
  • 1 1/2 cups fresh blueberries

Instructions:

  1. Preheat your oven to 375°F (190°C). Line a muffin tin with muffin cups or grease it with cooking spray.
  2. In a medium bowl, whisk together the flour, baking powder, and salt. Set aside.
  3. In a large bowl, cream together the butter and sugar until light and fluffy.
  4. Add the eggs, one at a time, beating well after each addition.
  5. Stir in the milk and vanilla extract.
  6. Add the dry ingredients to the wet ingredients, and mix until just combined.
  7. Gently fold in the blueberries.
  8. Scoop the batter into the prepared muffin cups, filling each cup about 3/4 full.
  9. Bake for 20 to 25 minutes, or until a toothpick inserted into the center of a muffin comes out clean.
  10. Let the muffins cool in the pan for a few minutes before transferring them to a wire rack to cool completely.

That’s it! Your easy blueberry muffins are ready to enjoy. You can serve them warm or at room temperature. They are perfect for breakfast, brunch, or as a snack. You can also store them in an airtight container at room temperature for up to 3 days.

Blueberry muffins
Photo by Deeana Arts

Tips:

  • You can use frozen blueberries instead of fresh ones, but do not thaw them before adding them to the batter.
  • If you do not have muffin cups, you can use a greased muffin tin. However, the muffins may stick to the tin, so be careful when removing them.
  • You can add a streusel topping to the muffins for extra texture and flavor. Mix together 1/4 cup all-purpose flour, 1/4 cup granulated sugar, and 2 tablespoons unsalted butter, until crumbly. Sprinkle the streusel over the muffin batter before baking.

I hope you enjoyed this easy blueberry muffins recipe. Let me know in the comments if you tried it and how it turned out. If you have any other tips or variations, feel free to share them as well. Happy baking!

Carrot Cake Recipe with Cream Cheese Frosting

Hey there!

I recently baked a delicious carrot cake with cream cheese frosting and I just had to share the recipe with you. It’s perfect for any occasion, whether it’s a birthday, holiday, or just because you’re in the mood for something sweet.

Ingredients:

  • 2 cups all-purpose flour
  • 2 teaspoons baking powder
  • 1 1/2 teaspoons baking soda
  • 1 teaspoon salt
  • 2 teaspoons ground cinnamon
  • 1/2 teaspoon ground nutmeg
  • 1/2 teaspoon ground ginger
  • 4 large eggs
  • 1 1/2 cups granulated sugar
  • 1 cup vegetable oil
  • 2 teaspoons vanilla extract
  • 3 cups grated carrots
  • 1/2 cup chopped walnuts (optional)

Instructions:

  1. Preheat your oven to 350°F (180°C).
  2. Grease and flour two 9-inch cake pans.
  3. Whisk together the flour, baking powder, baking soda, salt, cinnamon, nutmeg, and ginger in a medium bowl.
  4. In a separate large bowl, beat the eggs, sugar, oil, and vanilla extract until well combined.
  5. Gradually add the dry ingredients to the wet mixture and mix until just combined.
  6. Stir in the grated carrots and chopped walnuts (if using).
  7. Pour the batter into the prepared cake pans and bake for 30-35 minutes, or until a toothpick inserted into the center comes out clean.
  8. Let the cakes cool completely before frosting.


Carrot cake
Photo by chudesabyvaut


Cream Cheese Frosting:

  • 1/2 cup unsalted butter, softened
  • 8 ounces cream cheese, softened
  • 4 cups powdered sugar
  • 1 teaspoon vanilla extract

Instructions:

  1. In a large bowl, beat the butter and cream cheese together until smooth.
  2. Add in the powdered sugar and vanilla extract and beat until well combined.
  3. Frost the cooled cake with the cream cheese frosting and enjoy!

I hope you enjoy this recipe as much as I did. It’s the perfect balance of sweetness and spice, and the cream cheese frosting is the perfect complement to the carrot cake. Let me know in the comments if you try it out!

Baked Sweet Potato Fries Recipe

Hey guys!

I recently discovered a new recipe that I am absolutely in love with – Baked Sweet Potato Fries! Not only are they delicious, but they’re also a healthier alternative to regular fries.

Here’s what you’ll need:

  • 2 large sweet potatoes
  • Sweet Potato Fries
    Photo by Valeria Boltneva

  • 2 tablespoons of olive oil
  • 1 teaspoon of paprika
  • 1 teaspoon of garlic powder
  • Salt and pepper to taste

First, preheat your oven to 400°F. Then, peel and cut your sweet potatoes into fry shapes. I like to make them thin so they get crispy, but you can make them thicker if you prefer.

In a bowl, mix together the olive oil, paprika, garlic powder, salt, and pepper. Add the sweet potato fries and toss until they’re coated evenly.

Spread the fries out onto a baking sheet lined with parchment paper. Make sure they’re in a single layer so they cook evenly.

Bake for about 20-25 minutes, flipping them halfway through. You’ll know they’re done when they’re crispy and golden brown.

That’s it! Serve them hot with your favorite dipping sauce – I love ranch or honey mustard.

One of the best things about this recipe is that it’s so customizable. You can add different seasonings like cumin or chili powder to give them a different flavor. You can also experiment with different dipping sauces – I’ve even had them with a spicy ketchup that was amazing.

Give this recipe a try and let me know what you think!

Until next time,

[Your Name]